Large temporary event tents are widely used for concerts, exhibitions, festivals, sports events, and emergency shelters. Compared with traditional temporary structures, a Ringlock tent system combines the high load capacity of modular scaffolding with lightweight aluminum roof structures, allowing rapid installation while maintaining excellent structural stability.
If you are new to this type of structure, you may first learn about our Ringlock Structure System and Roof Truss Systems to better understand how these modular event structures are designed.
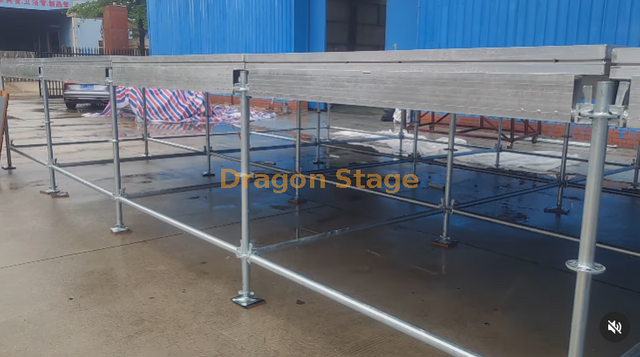
Step 1: Install the Decking Platform
The installation begins with the working platform.
The decking boards are laid flat to create a stable and level working surface for the installation crew. A properly aligned platform not only improves safety during construction but also provides better waterproof performance by minimizing gaps where rainwater could penetrate.
At this stage, installers should also verify that the foundation is level before continuing with the upper structure.
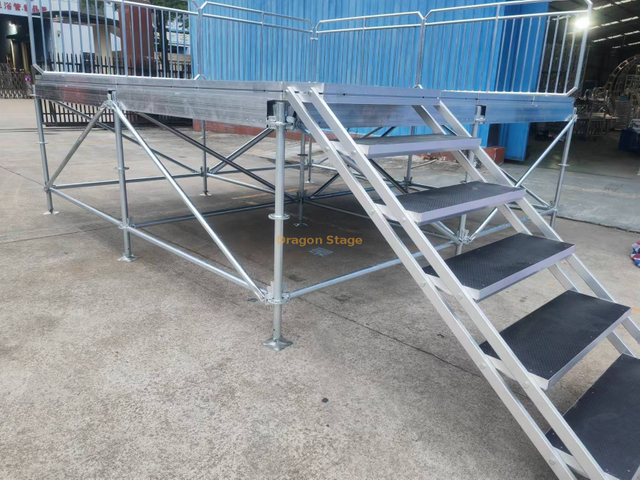
Step 2: Install the Tent Support Beams
Once the platform is completed, the main support beams are installed.
Each beam is connected using precision locking heads that ensure accurate positioning and secure load transfer between structural members. Proper engagement of every locking mechanism is essential because these connections become the primary load paths supporting the roof system.
After installation, all locking heads should be visually inspected before proceeding.
For larger temporary structures, these support members are often integrated with an Event Truss System or an aluminum Roof Truss to accommodate lighting, sound equipment, and roofing.
Step 3: Connect the Ringlock Nodes
The Ringlock connection system is one of the most important structural components of the tent.
Horizontal members and diagonal braces are connected through the circular rosette (Ringlock disc), allowing multiple members to meet at a single connection point. This modular design significantly improves overall rigidity while enabling fast installation.
Properly tightened Ringlock connections help distribute vertical and lateral loads evenly throughout the structure.
To learn more about the engineering principles behind this modular system, see What Is a Steel Ringlock Structure? and How Are Steel Ringlock Structures Installed?
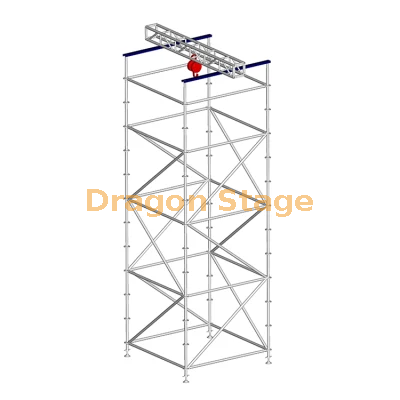
Step 4: Install the Cross Beams and Roof Beams
After the primary frame is secured, installers continue with the cross beams and roof beams.
These members form the roof framework and determine the geometry of the entire tent. During this stage, installers should continuously check beam alignment to prevent accumulated installation errors that could affect roof fabric tension later.
When all roof members are connected, the main structural frame is complete.
For projects requiring larger spans or suspended equipment, engineers often refer to complete Truss Systems when selecting the most appropriate structural configuration.
Step 5: Install the Roof Fabric
The roof fabric is installed using an integrated track system.
Compared with traditional rope fastening methods, the track system keeps the fabric evenly distributed and securely fixed along the entire roof span. Proper installation reduces wrinkles, improves water drainage, and enhances wind resistance.
Installers should ensure that the fabric slides smoothly into the track without twisting.
Step 6: Install the Sidewalls
After the roof is completed, the sidewall fabrics are attached around the perimeter.
Fully enclosed sidewalls increase privacy while reducing wind penetration and protecting the interior from rain and dust. Depending on project requirements, different sidewall materials such as PVC fabric, transparent panels, or mesh walls may be selected.
Step 7: Secure the Sidewall Straps and Pressure Bars
The sidewall straps are tightened to prevent movement during strong winds.
Pressure bars are then installed to evenly distribute the clamping force across the fabric. This prevents localized stress concentrations that could damage the fabric over time and helps maintain a neat appearance.
Every strap should be checked to ensure consistent tension.
Step 8: Install the Roof Tensioners
The final installation step is tensioning the roof.
Roof tensioners remove remaining slack from the fabric, creating a smooth roof surface that resists wind uplift and improves rainwater runoff. Proper roof tension not only enhances appearance but also extends the service life of the tent fabric by reducing unnecessary movement during operation.
After tensioning, the installation team should perform a complete structural inspection before the tent is put into service.
Why Proper Installation Matters
Although Ringlock tent systems are designed for rapid assembly, installation quality directly affects structural safety and service life.
A professional installation process provides several important benefits:
Improves overall structural stability
Enhances wind resistance
Increases waterproof performance
Reduces fabric wear
Speeds up future assembly and dismantling
Extends the lifespan of structural components
Before operating the structure, installers should also follow the recommendations described in What Should Be Paid Attention to When Using Event Truss? to ensure compliance with standard safety practices.
Common Ringlock Tent Installation Mistakes to Avoid
A modular Ringlock tent may appear straightforward to assemble, but small installation errors can significantly reduce its structural stability, waterproof performance, and resistance to wind. The following mistakes should be identified and corrected before the structure is placed into service.
1. Locking Heads Not Fully Engaged
One of the most common installation mistakes is failing to fully engage the locking heads with the Ringlock rosettes.
A connection may appear to be in position while the wedge or locking head has not been completely secured. Under vertical loading, vibration, or lateral movement, an incompletely locked connection may loosen and allow the connected member to move.
Installers should confirm that:
Each ledger head is correctly seated against the rosette.
Every wedge is fully driven into position.
No connector is visibly loose or misaligned.
Connections are inspected again after the primary frame has been assembled.
The locking system should never be treated as a simple positioning device. It forms part of the structural load path and must transfer forces reliably between standards, ledgers, braces, and roof-supporting members.
2. Assembling the Structure on an Uneven Foundation
Beginning installation without first checking the ground condition can cause the entire tent frame to become uneven.
If the standards are installed at different elevations, the problem may continue upward through the structure. This can result in:
Misaligned horizontal members
Uneven load distribution
Difficulty installing roof beams
Incorrect roof fabric tension
Localized stress at connections
Reduced overall structural stability
Before assembly, the ground should be inspected for levelness, bearing capacity, drainage, and possible settlement. Adjustable base jacks may compensate for limited elevation differences, but they should not be used to correct unsuitable or unstable ground conditions.
The initial grid should be carefully measured and leveled because errors introduced at the base are difficult to correct after the upper structure has been installed.
Roof fabric must be tensioned sufficiently to remain smooth and stable, but excessive or uneven tension can also cause problems.
If the fabric is too loose, it may:
Flap repeatedly in the wind
Collect rainwater
Form wrinkles or low points
Create noise during an event
Experience accelerated wear around connection points
If the fabric is tensioned too tightly or unevenly, excessive force may be transferred to the fabric edges, tracks, tensioners, and supporting roof members. This may distort the roof covering or overload individual attachment points.
Roof tension should therefore be applied gradually and symmetrically. Installers should check the fabric surface, drainage direction, edge engagement, and tensioner positions during the process rather than tightening one side completely before working on the other.
The objective is not simply to make the roof fabric look tight. The objective is to achieve controlled, balanced tension across the complete roof surface.
4. Omitting Diagonal Braces
Horizontal members define the structural grid, but they do not provide sufficient resistance to lateral deformation on their own.
Diagonal braces help stabilize the frame and prevent the rectangular bays from deforming into parallelogram shapes under wind, installation forces, or accidental horizontal loading. Missing braces can substantially reduce the stiffness of a Ringlock tent, even when all standards and ledgers appear correctly connected.
Installers should never remove braces merely because they interfere with access, sidewall installation, or interior use. Any modification to the bracing arrangement should be reviewed as part of the overall structural configuration.
Before installing the roof covering, the crew should verify that:
All specified diagonal braces are installed.
Braces are placed in the correct bays.
Brace ends are fully secured.
No brace is bent, damaged, or improperly substituted.
Temporary stability is maintained throughout erection.
Strong wind is one of the most serious hazards during the installation of a temporary tent.
Before the complete structure, roof fabric, braces, anchorage, and tensioning system are in place, the partially assembled frame may be much more vulnerable than the completed structure. Roof fabric can also act like a sail during installation, creating sudden uplift or lateral forces that workers may be unable to control.
Installation should be suspended when wind conditions exceed the safe working limits established for the project, equipment, and installation method. Particular caution is required when:
Lifting or positioning roof beams
Pulling roof fabric across the frame
Installing large sidewall panels
Working at height
Moving partially assembled structural sections
Handling components with large exposed surface areas
Weather conditions should be monitored before and throughout the installation process. A deadline or event schedule should never take priority over worker safety and temporary structural stability.
After all installation work is complete, the tent should undergo a systematic final inspection. The inspection should verify:
Foundation and base-jack condition
Vertical alignment of standards
Full engagement of locking heads
Completion of diagonal bracing
Correct installation of roof and cross beams
Proper engagement of roof fabric in the tracks
Balanced roof tension
Secure sidewall straps and pressure bars
Correct anchorage or ballast arrangement
Absence of damaged, bent, or substituted components
A Ringlock tent should only be placed into service after the installer confirms that the entire structure—not merely its individual components—has been assembled according to the intended configuration.
Frequently Asked Questions
How long does it take to assemble a Ringlock tent?
Depending on the size and crew experience, most medium-sized event tents can be assembled within one to several days.
Why is the Ringlock system widely used for event tents?
Its modular connection design provides high strength, fast installation, and excellent adaptability to different event layouts.
Is roof tension really necessary?
Yes. Proper roof tension improves waterproof performance, reduces wind-induced movement, and prolongs fabric life.
Can Ringlock tents be installed on uneven ground?
Minor unevenness can be adjusted using base jacks, but the foundation should always be properly prepared before installation.
Can the structure be reused?
Yes. Ringlock tent systems are designed for repeated assembly and dismantling, making them suitable for touring events and rental businesses.
What weather conditions should be avoided during installation?
Installation should be suspended during strong winds, thunderstorms, or other severe weather conditions that may compromise worker safety.
Related Engineering Resources
For a deeper understanding of temporary event structures, you may also be interested in the following resources:
Ringlock Structure System Learn how modular Ringlock structures are configured for temporary event platforms, support towers, enclosed structures, and other applications.
Roof Truss Systems Explore different roof truss configurations used for temporary tents, concerts, festivals, exhibitions, and outdoor event structures.
Event Truss Systems Review aluminum truss systems designed to support lighting, audio equipment, LED screens, roofing, and event production equipment.
Truss Systems Knowledge Center Browse structural guides, application information, installation practices, and product resources related to event truss systems.
How Does a Truss System Work for Events? Learn how event truss systems transfer structural loads and support lighting, sound systems, LED displays, and temporary roofs.
Installation & Practice Knowledge Center Explore additional installation guides, practical construction methods, inspection procedures, and real-world setup experience.
Conclusion
A professional Ringlock tent combines modular engineering with efficient installation, making it one of the most reliable temporary shelter solutions for modern events. By following a standardized installation sequence—from decking and structural framing to fabric tensioning—contractors can achieve a safe, durable, and weather-resistant structure that performs reliably throughout the event while remaining easy to dismantle and reuse.
The DragonStage 32x24x18m Large Ringlock Scaffold Roof Truss Structure combines a large modular Ringlock support system with a heavy-duty aluminum pitched-roof truss framework.
Designed for stadium-scale ceremonies, festivals, cultural performances and large outdoor event productions, the system integrates extensive scaffold support zones, heavy aluminum roof trusses, custom roof connectors, tensioning components and a large roof canopy.
The drawing identifies a nominal 32m × 24m × 18m configuration, with the overall height shown at approximately 18.21m.
A complete professional event sound package combining 16 dual-12-inch passive line array speakers, 10 dual-18-inch subwoofers, 6 stage monitors, dedicated Class-D power amplifiers, dual 4-in/8-out DSP processors, power management, wireless microphones, rigging frames, flight cases, amplifier racks and cabling.
This system is designed for concerts, live performances, festivals, touring productions and other professional event sound applications where the customer needs a coordinated PA package rather than individual speakers.
For other professional audio systems, see Stage Sound.
The DragonStage 15×10×8m Aluminum Curved Roof Truss System is a modular concert-stage roofing structure featuring a curved overhead truss framework, four main support towers, and two additional side-wing towers.
The system uses CS389×389mm and CS289×289mm aluminum spigot truss, sleeve block assemblies, BA05 manual hoists, tower bases, outriggers, and a PVC roof canopy. The side wings extend the configuration for additional event-production arrangements, subject to the final equipment layout and verified loading requirements.
Designed for concerts, music festivals, touring productions, and temporary entertainment stages, this system can be supplied with matching modular stage platforms and accessories.
Custom Star Shape Truss Aluminum for Wedding Decoration Art Design
Pentagram,five-pointed star
The DragonStage Custom Five-Point Star Aluminum Truss is a decorative event structure designed for wedding backdrops, stage displays, photo areas, exhibition decoration, and artistic event installations.
Featuring a distinctive pentagram-style star shape, the product is available in 2.5×2.63m, 3×3.15m, and 4×3.8m configurations, with selected 200mm and 300mm truss section options.
The customized star geometry provides an alternative to conventional square, rectangular, or circular event truss structures.
The DragonStage 9x6m Bolt Truss Gantry System is a modular event-support structure featuring two vertical truss towers, a horizontal bolt-connected truss beam, tower-head assemblies, base plates, and diagonal outrigger bracing.
With a nominal horizontal dimension of 9m (29.5ft) and a height of 6m (19.7ft), this open-frame structure is intended for event lighting, stage production, backdrop framing, and temporary gantry applications. Final truss specifications, support arrangements, and equipment loads are confirmed according to the project requirements.
The DragonStage 36x18x12m Large Concert Stage Roof Truss System is a large-format modular event structure featuring a multi-tower truss support system, an elevated overhead truss framework, and a modular stage platform with guardrails and stair access.
With nominal dimensions of 36m wide × 18m deep × 12m high (120ft × 60ft × 40ft), this configuration is intended for large concerts, music festivals, live performances, and temporary entertainment productions requiring an extensive stage area and overhead structural framework.
The DragonStage 6.72x4.89m modular event stage combines a 0.6m-high red stage platform with a 7.7m-wide, 4.4m-high rear box truss gantry. The open-top configuration provides a raised performance area and a separate overhead truss frame for event backdrop and production applications. Suitable for concerts, school performances, ceremonies, and indoor events, with final accessories and rigging requirements confirmed according to the project.
The DragonStage 25x10m Ringlock Grandstand is a large modular spectator-seating system designed for temporary sports events, school competitions, festivals, public performances, and other audience gatherings. Measuring 25m wide × 10m deep, the illustrated configuration features tiered seating, two access aisles, and three-sided guardrails. The specified main height is 2.5m, with an overall height of 3.5m. The modular Ringlock system can be configured according to the required seating layout, access arrangement, and project conditions.
A heavy duty iron adjustable clamp specifically designed for use in clear span marquees using grooved aluminium kader style beams. It has M10, M12 and M14 tapped mounting points.
Our professional Aluminum Alloy Spigot Square Truss is the industry standard for high-performance rigging. Designed with a robust modular system logic, this versatile solution is perfect for concert and event stages. It offers exceptional load-bearing stability and a sleek finish for supporting professional lighting and LED screens.
Section:Square200x200mm inclined tube: 12x2.0mm Main tube: 30x2.0mm Length:0.5/1/2/2.5m Braces: 20x2.0mm
This premium 200x200mm Aluminum Spigot Box Truss offers a compact yet incredibly strong structural solution. Ideal for exhibitions and trade shows, its high-precision conical connection system ensures rapid assembly. It is the perfect professional choice for creating sophisticated lighting truss grids in any concert and event stage environment.
Our 290mm Aluminum Square Spigot Truss with 50x3mm main tubing is a heavy-duty solution for professional rigging. Utilizing a modular system logic, this versatile series is ideal for concert and event stages, offering exceptional load-bearing stability and rapid assembly for any production environment.
The Dragonstage Aluminum Spigot 520x520mm Square Box 6 Ways Corner Truss Cube Connector is a device for constructing large, sturdy structures that are sturdy and lightweight. This device is made of aluminum, which is durable and lightweight. The product has a size of 520x520mm and can be used for building structures in 6 different ways. It also comes with two pieces of aluminum screws for assembling the structure. The device is able to withstand high pressure, so it is perfect for heavy objects.
This box can be used to create a stable structure for your display or party. You can use this box to create a corner truss cube. It can be used for exhibitions, retail, and party displays. The box has a 400x400mm or 389x389mm square opening. The box has six ways to connect.
Dragonstage Aluminum Spigot 300x300mm / 289x289mm Square Box 6 Ways Corner Truss Cube Connector is an aluminum spigot with a 300x300mm square box with 6 ways corner truss cube connector. This aluminum spigot is perfect for hanging lights, air conditioning, and other things. The dimensions of the spigot are 300x300mm square box with 6 ways corner truss cube connector.
Aluminum Spigot Truss Aluminum Base Plate with Handles 300mm 400mm 500mm 600mm 800mm with half conical and pins clips.
The DragonStage Aluminum Spigot Truss Base Plate with Handles is available in five square sizes from 300×300mm to 800×800mm, all using an 8mm-thick aluminum plate. Each configuration can be supplied with compatible half conical connectors, connector pins and R-clips for spigot truss installation. Integrated handles make the plates more practical to carry and position during repeated event setup and teardown.
this is 100x100x3mm base plate for f14 truss mini, with 4 half connectors and pins clips.
The DragonStage F14 Mini Truss Square Base Plate is a compact 100 × 100 × 3mm base plate supplied with 4 half conical connectors, connector pins and R-clips for compatible F14 mini truss systems. It is designed as a small mounting and connection accessory for exhibition, display, DJ, decorative and lightweight mini-truss applications.
Section:Square400x500mm Inclined tube: 25x2.0mm Main tube:50x3.0mm Braces:50x2.0mm Material: Aluminum 6061-T6
Our high-strength 500x400mm lighting truss is engineered from premium aluminum alloy for superior load-bearing performance. Ideal for music and audio setups, this durable screw-connection system ensures stability for professional stage environments. Built to meet rigorous safety standards, it provides a reliable foundation for any event production.
Section:Square500x500mm Inclined tube: 25x2.0mm Main tube:50x3.0mm Braces:50x2.0mm Material: Aluminum 6061-T6 This heavy-duty 500x500mm bolt aluminum square truss is the ultimate foundation for outdoor concert stages and large-scale events. Engineered for maximum structural stability, this aluminum truss system provides the high-load capacity needed to support massive lighting rigs and heavy audio arrays safely in any environment.
Section:Square400x400mm Inclined tube: 25x2.0mm Main tube:50x3.0mm Braces:50x2.0mm Material: Aluminum 6061-T6
This versatile 400x400mm aluminum roof screw lighting truss is the industry standard for medium-to-heavy stage rigging. Engineered for exceptional durability, this high-performance aluminum truss system supports heavy lighting and audio equipment with ease. It is the perfect foundation for building safe, professional modular stage systems for any event.
The DragonStage 4.88x2.44m Adjustable Outdoor Event Stage is a compact 16x8ft temporary platform with two access stairs and an adjustable height of 0.6–1.0m. It is designed for community events, ceremonies, school performances, church activities, DJ shows, presentations, and other temporary indoor or outdoor applications where a medium-size stage with flexible access is required.
Park Aluminum Portable Square Stage 8.54x6.1m 28x20ft Height: 0.8-1m
The DragonStage 8.54x6.1m Aluminum Park & Community Event Stage is a 28x20ft brace-supported modular platform built from 35 standard 4x4ft stage decks. The complete configuration includes 18mm anti-slip plywood decking, adjustable support stands, three-side guardrails, a 4-step stair, and black stage skirting, making it suitable for community concerts, park events, ceremonies, public performances, school activities, and temporary outdoor stages.
The Concert Custom Adjustable Portable Stage is the perfect addition to any concert venue. The Concert Custom Adjustable Cheap Portable Stage is a portable stage that is lightweight and easy to set up. It can be adjusted to the height of the performer and is available in two different colors. The Concert Custom Adjustable Cheap Portable Stage is made of durable, lightweight aluminum that will last for years to come. It has a black aluminum top with four black steel legs. The Concert Custom Adjustable Cheap Portable Stage is very easy to set up and is very stable.
Aluminum Mini Modular Stage Panel Flooring Systems 2.44x2.44m 8x8ft Height 0.6-1m with 1 stair.
The DragonStage 2.44x2.44m Adjustable Aluminum Modular Stage is a compact 8x8ft brace-supported event platform built from two standard 4x8ft / 1.22x2.44m wooden-topped stage panels. With an adjustable finished height of 0.6-1.0m, extendable support stands, stage braces, adjustable bases, and stair access components, it is suitable for small performances, DJ events, ceremonies, church activities, presentations, and temporary event staging.
Assemble Portable Stage Movable Aluminum Stage for Outdoor Concert Event 2.44x1.22m 8x4ft with 1 stair.
The DragonStage 2.44x1.22m Portable Aluminum Stage Kit is a compact 8x4ft temporary event platform supplied with one access stair. Designed for small outdoor concerts, DJ performances, speeches, ceremonies, promotions, and temporary event use, the modular stage can also be combined with additional compatible 4x8ft units when a larger platform is required.
The DragonStage 3.8x3.4m Aluminum Arch Truss Gateway is a compact curved entrance structure built from 290×290mm spigot truss with 300×500mm base plates. With overall external dimensions of approximately 3800mm wide × 3400mm high, it is designed for wedding entrances, exhibition gateways, red-carpet areas, event decoration, photo zones, and other temporary event displays.
Base plate only for the U-Frame 50. LED cans and moving heads can be installed freeriding in the room. In combination with the optional wheels the U-Frame Dolly will be an indispensable element on stages and show acts.
U-frame Truss And Dolly, it is custom U torm trusses (660 × 500 × 50mm) for 4 (4 utorm trusses+ top bar+ dolly) and 5 (4 utorm trusses+ top bar+ dolly) Robots in black color.
the dolly is made of 1.2x0.6m aluminum plate, thickness 8mm and 4 casters.
The DragonStage 5.49x1.22m Straight Aluminum Event Stage Ramp provides a direct access route for wedding stages, corporate events, ceremonies, hotel functions, and other temporary platforms. The ramp measures approximately 18ft long × 4ft wide (5.49 × 1.22m) and uses modular 4 × 4ft / 1.22 × 1.22m deck sections with 1m / 3.28ft high guardrails along both sides.
The DragonStage 3.0x1.22m Compact Aluminum Stage Transition Ramp provides a short, direct access route between ground level and temporary event stages. With an overall length of approximately 3.0m / 9.84ftand a width of approximately 1.22m / 4ft, the ramp uses modular aluminum stage components and includes 1m / 3.28ft high guardrailson both sides.
The DragonStage 7.84x1.23m Narrow Straight Aluminum Stage Access Ramp provides a direct route between ground level and an elevated temporary stage for performers, speakers, technicians, event staff, and production crew. Its slim footprint measures approximately 308⅝ × 48⅜ in (7.84 × 1.23m)and uses modular 4 × 4 ft / 1.22 × 1.22mramp deck sections with 1m / 3.28ft high guardrailsalong both sides.
The DragonStage 10.30x1.63m Straight Aluminum Stage Production Loading Ramp provides a direct access route between ground level and temporary event stages. With an overall external size of approximately 405½ × 64⅛ in (10.30 × 1.63m), the system uses standard 4 × 4 ft / 1.22 × 1.22m modular deck sections and 1m / 3.28ft high guardrails along both sides. It is suitable for road cases, AV equipment, production carts, technicians, and general backstage stage access.
The DragonStage 7.32x3.05m Compact Switchback Aluminum Stage Service Ramp provides a continuous access route for AV carts, production trolleys, touring equipment, technicians, and stage crew. Its compact U-shaped footprint measures approximately 24 × 10 ft (7.32 × 3.05m)and uses standard 4 × 4 ft / 1.22 × 1.22mmodular ramp decks with 1m / 3.28ft high guardrailsalong both sides.
The DragonStage 7.40x8.26m L-Shaped Aluminum Backstage Loading Ramp is designed for moving flight cases, lighting cases, audio equipment carts, cable boxes, production trolleys, and event equipment between ground level and temporary stages. The 90-degree layout has an overall footprint of approximately 291⅜ in × 325¼ in (7.40m × 8.26m) and uses standard 4 × 4 ft / 1.22 × 1.22m modular deck sections with 1m / 3.28ft high guardrails along both sides.
The DragonStage 9.82x3.23m Switchback Modular Aluminum Event Stage Ramp is designed for temporary stages requiring a continuous access route for wheelchairs, performers, event staff, carts, and wheeled concert equipment. The compact U-shaped layout measures approximately 386⅝ in × 127¼ in (9.82m × 3.23m) and uses standard 4 × 4 ft / 1.22 × 1.22m modular ramp deck sections with 1m / 3.28ft high guardrails along both sides.
The DragonStage 9.82x8.26m 90-Degree Modular Aluminum Event Stage Ramp is designed for temporary stages that need a continuous access route for wheelchairs, performers, event staff, carts, and wheeled concert equipment. The L-shaped layout measures approximately 386⅝ in × 325¼ in (9.82m × 8.26m)and uses standard 4 × 4 ft / 1.22 × 1.22mmodular deck sections with 1m / 3.28ft high guardrailsalong both sides.
The DragonStage 10.27x3.24m Switchback Modular Aluminum Stage Ramp is a compact U-shaped access system for temporary stages and elevated event platforms. The overall footprint is approximately 404⅜ in × 127½ in (10.27m × 3.24m). It uses standard 4 × 4 ft / 1.22 × 1.22m modular ramp deck sections, with two parallel ramp runs connected by a turning landing and 1m / 3.28ft high guardrails along both sides.